Interrupt Based Timer for ATmega328P
This project is an example of an interrupt based timer for the commonly used ATmega328P microcontroller. Powered by CMake and platformIO

Software Engineer, Maker
Why use interrupt based timers?
There is two main approaches when it comes to delaying something in embedded systems. In most basic terms, busy waiting is the act of giving a long and unnecessary work to the CPU, so you can block it from processing the next operation. This is wasteful both in terms of CPU resources and power. In contrast, interrupt based waiting is the act of starting a timer which will wait on its own without blocking the CPU until the time comes. When the timer runs out; it will go ahead and interrupt the CPU and ask it to do whatever task that is assigned to that timer.
This project is an example of interrupt based waiting, but I will explain both options with examples. Below you can see a chart which shows the difference of busy waiting and interrupt based waiting.
https://users.ece.utexas.edu/%7Evalvano/Volume1/E-Book/C12_Interrupts.htm
1. Busy Waiting - the blocking selfish way
The selfish and the easy way of delaying something is just blocking the CPU with some unnecessary work, usually by creating loops that accomplish nothing but look like they do to the compiler. If compiler realises that your new shiny loop is not doing anything useful it will just throw it out in the optimization phase. You can always disable or change the optimization level, but I will just assume that you are using the default level of optimization.
An example to this can be; assigning or reading a value from a volatile variable over and over. The below code will block the CPU for however long it takes for the CPU to process that operation for 100 times.
// Define a volatile variable
#define SOMEVAR (*(volatile uint8_t *) (0x80))

for (int i = 0; i < 100; ++i) {
    // Set a value to the volatile variable.
    // If this is not volatile, the compiler will run this only once and
    // optimize out the rest of it to save time and resources since it
    // basically does nothing. But because it  is volatile it has no way
    // to know if this value will be the same since declaring as volatile
    // means that this value can change any time by
    // a factor that is not known to the compiler.
    SOMEVAR = 0x00;
}
If manually implemented this option requires the developer to perform some calculations in order to understand how long this delay will take, or you can always do trial and error to guesstimate the time it takes and try to get it to a value close to what you are looking for but that's going to take some time going back and forth and will require an oscilloscope to get it at least close to the value you looking for (no, you can't use your phone's timer).
The delay(ms) function that all of us know from the Arduino lib is an example of busy waiting.
2. Interrupt Based Waiting - non blocking way
Another and arguably the better way of waiting for something is using timers with interrupts to free the CPU from the waiting task. This works as in that when the timer is triggered it will go ahead and interrupt the CPU from whatever it is doing and will ask it to do what it wants immediately. For more details about how interrupts work, visit the website of University of Texas at Austin.
An example code snippet for an interrupt based timer using the 16-bit Timer 1 of ATmega328P can be found below.
ISR (TIMER1_OVF_vect) {
    PORTB ^= (1 << PORTB5); // Toggle the 5th data register of PORTB
    TCNT1 = 64755; // 50 ms for 16MHz clock
}

int main() {
    // Set 5th data direction register of PORTB. A set value means output
    DDRB = (1 << DDB5);
    // 50 ms for 16MHz clock
    TCNT1 = 64755;
    // Set normal counter mode
    TCCR1A = 0x00;
    // Set 1024 pre-scaler
    TCCR1B = (1<<CS10) | (1<<CS12);
    // Set overflow interrupt enable bit
    TIMSK1 = (1 << TOIE1);
    sei(); // Enable interrupts globally
    while(1)
    {
        // Do anything, this timer is non-blocking.
        // It will interrupt the CPU only when needed
    }
    // Add return so compilers don't cry about it being missing.
    // Under normal circumstances this will never be hit
    return 0;
}
This creates a non-blocking interrupt based timer that will toggle the 5th data register of PORTB every 50ms.
But how do we calculate how long we need to wait? Unless we need to change the wait time in the runtime we should
pre-compute the value for TCNT1 which is in basic terms what determines the wait time.
Calculate the wait time
So how do we calculate the value we put on TCNT1 according to the wait time we want.
1. Divide Frequency to pre-scaler
Since we are using the Timer 1 of the ATmega328P and this timer is running on 16MHz we divide this value by our selected pre-scaler of 1024.
Freq/Pre-scaler => 16MHz/1024 = 15.625KHz
2. Calculate the tick time
Then we get the 1 over of this value to find our tick time. Which is 64 micro seconds.
1/15.625KHz = 64μs
3. Get delay time
Our clock is 16-bit therefore we need to subtract t/64μs from 2^16 = 65536 which will in turn give us the value
we need to put in TCNT1. Where t is the time we want to wait in milliseconds.
TCNT1 = 2^16 - (t/64μs)
For example, if we want to have wait time of 100ms we would calculate it as;
TCNT1 = 2^16 - (100/0.064) => TCNT1 = 65536 - 1562 => TCNT1 = 63974
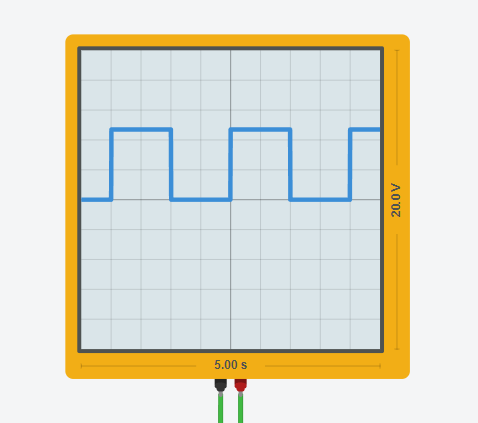
Example output
Below you can see an example output displayed on a simulated oscilloscope when the timer is set to have a delay of 1 second.
Source code
The full source code to compliment this post is available in my Github profile. There you can find an example interrupt based timer that toggles a pin every 50ms by changing the data registers. Pull requests are welcome. For major changes, please open an issue first to discuss what you would like to change.